VoiceDucker · Practical guide
Keep the music down while you talk.
VoiceDucker started as a VibeWare project, out of my frustration with constantly turning Spotify down. I talk to AI assistants throughout my working day and have plenty of meetings, usually with music playing. I wanted the music to make room for my voice without reaching for the volume slider every time.
Screenshots show desktop version 1.0.15.0, with English controls and example values. They are not factory defaults. Available controls can differ by installed version and release channel.
Why I wanted some order in my audio
Browser tabs were another frustration: a website could start playing at full volume and blast my headphones. I wanted one place to adjust Spotify, browsers and other music apps, with rules for lowering selected playback when my microphone detects sound. This guide explains what each setting does and how I use it.
VoiceDucker reads microphone signal levels and the levels of active Windows audio sessions in real time. According to the rules I choose, it adjusts only the volumes of eligible apps. It does not capture the screen or inspect what is on it. Automatic ducking is triggered by microphone sound; the app is not a peak limiter for everything I hear.
Start here
- Open VoiceDucker and start some music. The microphone is off until you press Enable.
- Click the Settings cog at the top. A pane slides out on the right and the window gets wider. Click the cog again to close it. Only one settings section opens at a time; its contents scroll without making the main window taller.
- Press Enable and compare the microphone meter while you are quiet and while you speak normally. Choose a trigger above the background noise but below your usual voice level.
- Use Disable to stop listening. Valid audio settings are saved as you change them; opening Settings never starts the microphone.
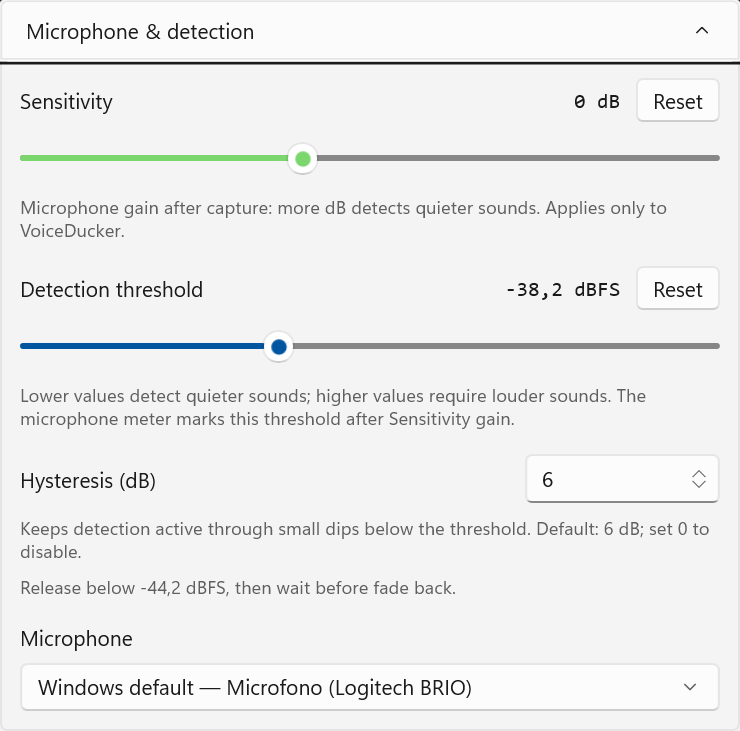
Microphone & detection
These controls decide when playback should stay down. They affect detection inside VoiceDucker, not the microphone level received by your call, recorder or other apps.
- Sensitivity
−24 to +36 dB · default 0 dB
Software gain before the meter and detector. Positive values make quieter sounds easier to detect; negative values make them harder to detect. Reset returns to 0 dB. Keep it near zero initially and tune the threshold first.
- Detection threshold
−60 to 0 dBFS · default about −34.9 dBFS
The level that activates detection. More negative values detect weaker sounds; values nearer zero require louder sounds. dBFS measures digital signal level, not room loudness. If silence reads −50 and your voice −30 dBFS, try a trigger around −40, then test in your room. Reset restores the original threshold.
- Hysteresis (dB)
0 to 12 dB · default 6 dB
A gap between the trigger and release levels. After detection starts, small dips below the trigger keep it active. With a −35 dBFS trigger and a 6 dB gap, the signal must fall below −41 dBFS before the waiting phase can finish. A level inside the gap cannot start detection from silence. Set 0 for a single threshold.
- Microphone
Windows communications default, or a specific active input
Select the input you actually speak into. Changing it while enabled restarts capture on that input. If a saved input is missing, I show the problem instead of silently switching to another microphone. Selecting an input while disabled keeps listening off.
Volume & timing
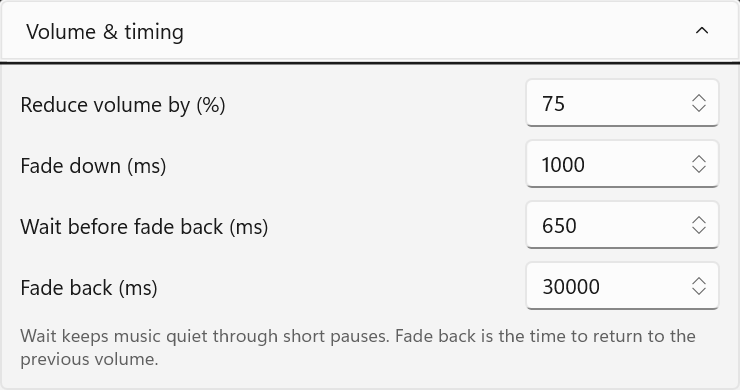
Playback moves between your existing session level and a reduced level. Detection and its waiting period determine when those transitions begin.
- Reduce volume by (%)
0 to 100% · default 90%
How much to reduce the app’s Windows session slider relative to its starting value. At 50% reduction, a session starting at 80% moves toward 40%; at 75% reduction, it moves toward 20%. This is a slider calculation, not a percentage of perceived loudness. Smaller reductions make the contrast less dramatic.
- Fade down (ms)
0 to 5,000 ms · default 300 ms
Time to reach the reduced level when sound is detected. Short times make room for speech quickly; longer times soften the transition but leave more music under the beginning of your sentence. Zero changes the level immediately.
- Wait before fade back (ms)
0 to 10,000 ms · default 650 ms
Keeps playback down through short pauses after the last sound sustained by detection. Hysteresis helps sustain detection before this pause expires. Try 1,500–2,000 ms if music begins to return between phrases. Zero removes this extra waiting period.
- Fade back (ms)
0 to 30,000 ms · default 30,000 ms
Time to return to the previous level after the waiting period. New detected sound interrupts the return and starts fading down again. A very long return may spend much of a conversation rising and being interrupted; this is separate from how long the app waits.
Apps & startup
- Also lower other apps
Off by default
Spotify is included by default. Turn this on to include other eligible playing apps, such as a browser. VoiceDucker changes app sessions, not Windows master volume, and leaves muted or silent sessions alone.
- Hidden apps
Shown when there are previously excluded apps
Restore an app that was previously hidden from VoiceDucker. Exclusions are saved. If you move a session’s slider yourself, VoiceDucker respects the manual change instead of forcing its old level back.
- Start with Windows (opens with mic off)
Startup preference
Starts the app when you sign in. Listening still begins only when you press Enable. The per-app sliders in the main window control the corresponding Windows audio sessions.
If the music keeps going up and down
- First check the meter in silence. If background sound crosses the trigger, raise the threshold toward zero or reduce Sensitivity. Hysteresis helps with small dips; it cannot distinguish your voice from music, a fan or a keyboard.
- As a starting experiment, try 50% reduction, a 2,000 ms wait and 6 dB hysteresis. Speak, pause and listen before changing another setting. These are trial values, not a universal preset.
- If sound remains above the release level, detection stays active. A very large hysteresis gap can therefore keep the music down longer than expected. Reduce the gap or raise the trigger if the room is noisy.
Is this automatic gain control?
No. Hysteresis stabilizes the on/off decision; it does not level the music or normalize your voice. AGC would automatically adjust signal gain toward a target. Sensitivity is manual gain, and this version does not add AGC or speech recognition.
Your microphone stays local
I do not record or save microphone audio, capture the screen, or send audio to a server. Signal analysis happens locally in memory, in real time. VoiceDucker saves settings and exclusions so I do not have to enter them again; it does not save a history of audio levels. The screenshots were taken with listening off. Any sufficiently loud sound picked up by the microphone can trigger detection.